Build Docker Images
All image build processes will start with a FROM statement. This indicates that the previous image (compound on layers) will be used to add new components, binaries, configurations, or actions for building our new image.
There are three methods for creating images:
-
Using a file with all the instructions to create this image (Dockerfile) A Dockerfile is a script file that describes all the steps required to create a new image.
 FROM ubuntu:18.04
 RUN apt-get update -qq && apt-get install -qq package1 package2
 COPY . /myapp
 RUN make /myapp
 CMD python /myapp/app.py
docker image build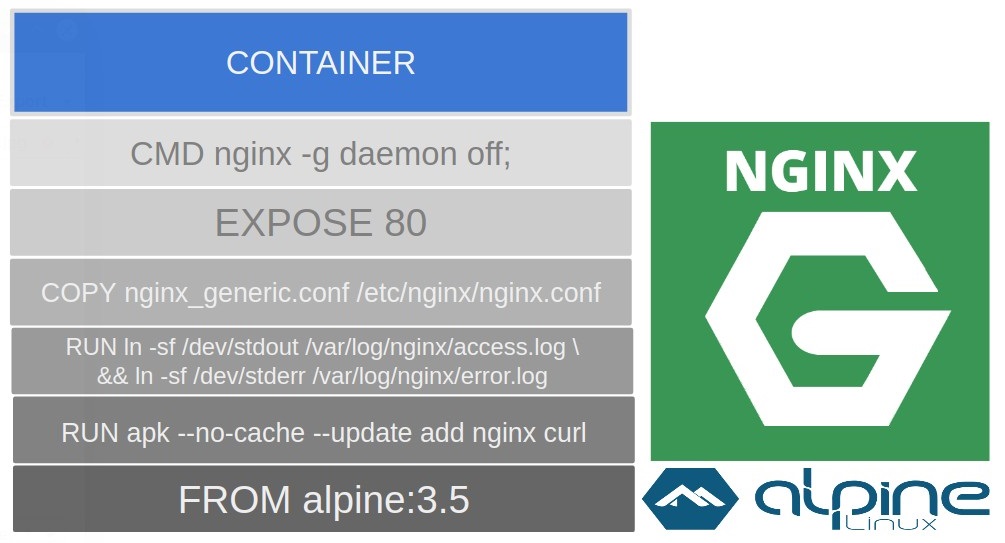
-
Interacting with files in different container layers, executing one container, modifying its content, and then storing the changes made (commit)
 1. Start an interactive container: docker container run -ti debian
 2. Update the package's database and then install: apt-get install postfix
 3. Exit the current container: exit
 4. Save the container layer as a new image layer (which means that we have created a new image with a name or identification if we omit it): docker container ls -l, docker container commit f11f8ad3b336 debian-with-postfix
The container adds a thin layer on top of image layers and every change made during the execution of its processes will be stored only on this layer.
-
Using an empty layer and adding components by hand, file by file, also known as creating an image from scratch
 FROM scratch
 ADD hello /
 CMD ["/hello"]
Scratch is not a real image; it only contains the root filesystem structure and its meta-information. It will be empty and we have to add each required file. This procedure is not easy and requires much more practice, but images are way better because they will only contain the pieces required for our application.
Dockerfile Keywords
FROM: base image
ARG: building argument
LABEL: add meta-info key-value pairs
ENV:set environment variables for next steps
WORKDIR:set directory for next steps
RUN:execute commands in a new layer (one layer for one RUN)
COPY:copy new files from building context to container filesystem
ADD:COPY supporting URLs and TAR packages
USER:specify the group:user
VOLUME:create a mount point to bypass the CoW system
EXPOSE:listening ports inside the container’s network
CMD:define the default process when executing the container
ENTRYPOINT:set which command container will run as an executable
HEALTHCHECK:run inside the container to verify the health of the process or processes
Docker image commands
For management: ls, prune, rm, and tag. These actions allow us to list, remove, and set identifications for images.
To get information: history and inspect. These actions provide information about the steps that need to be followed to create that image and all its properties.
To share images between hosts: pull, push, load, import, and save. These actions allow us to interact with the registry to download and upload image layers, and different ways to import and export images to and from different Docker hosts.
To create new images: build. Using the build action, we will be able to create new images, using base images or starting from an empty root filesystem.
Docker Registry
Docker Registry is a server application that will store and let us download and upload images as required. It provides an API for sharing information and image layers using a Docker client.
Docker Registry is an open source solution and can be configured using the /etc/docker/registry/config.yml configuration file to change storage backends, ports, and other advanced settings.
Images will be stored locally using the settings defined at the Docker daemon level. To use remote registries, we will set up different storage backends.
We can download images manually using docker image pull <IMAGE:TAG>. This will download all image layers and we will be ready to launch a new container based on this image.
Images are always required to execute a container. Therefore, each time we run a new container, the image will be downloaded from a registry if it is not present on the Docker host.
Consequently, we will use Docker push to upload images to registries. But remember to use the full name, including the registry’s fully qualified domain name and port (if we are not using docker.io and the default 443 port)
docker image save will create a .tar file containing all the layers, along with all their files, and the manifest file (among other meta-information) required to recreate that image in your host. docker image import just import image layers, docker image load to load a saved image along with all its layers and information for launching containers.